Now that you've read up on soapmaking, here's how I made my soap!
I found my recipe online but checked it in a lye calulator to make sure it was accurate. Note: do not use an online recipe without first running it through a lye calulator. Do not substitute oils in a recipe without using a lye calculator.
My preferred calculators are Soap Calc and the one from Majestic Mountain Sage.
Once you've completed your recipe, time to get down to business! Gather up your gear.
This includes: oils and fats, lye, water (distilled is preferred), fragrance, a container to mix the lye solution, a container to weigh the lye in, a bowl to weigh the oils in, lye mixing spatula/ spoon, oil/soap spatula, accurate scale (which at least measures in ounces, I use grams) stick blender, crock pot, and molds. If you want to do a swirl you need additional containers. It sounds like a lot, but a lot of these things I found free or cheap from thrift stores and from family who were getting rid of some things.
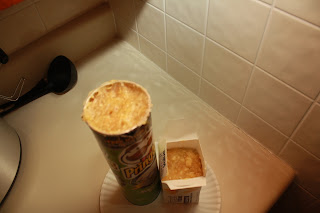
With hot process, you can use almost anything for a mold. I used a Pringles can and an old cardboard butter box. No need to line them. (Though my soap stuck like a beast to the chip can)
I apologize in advance for the lack of prep pictures but I did not want to get too distracted while handling the lye and make a mistake.
Step One:
Prepare all of your supplies in your soaping area and don your protective gear. I wear long pants, long sleeves, and heavy gloves for washing dishes. My gloves like to slip so I put bands around them. 
I think I paid a dollar for them.
I would also recomment eye protection/goggles and a face mask if you are sensitive to fumes. I like to protect my work counter with a plastic tablecloth as well, just in case the lye spills.
Step Two: Take your designated oil-weighing bowl and weigh your liquid oils. Add them to the slow cooker. Be sure to scrape out the bowl really well (I had the cooker off at this point, warm would be okay too).
Step Three: Measure or weigh out your water. I weigh since I like to use a mixture of ice cubes and regular water. Note that water is the only thing that you can use fluid measures for!
Step Four: Place your lye bowl on the scale (don't forget to zero/tare the scale!!) and measure out the lye. Then, slowly pour the lye into the water, stirring constantly. Always pour lye into water, not the other way around or it may cause a very serious reaction. I like to think "the snow falls on the lake."
Step Five: Stir until the mixture becomes clear and all the lye has dissolved, then set aside to cool a bit.
Step Six: In your oil bowl, measure out all of your hard fats. At this point you can add them to the slow cooker to melt or melt them in the microwave. I let them melt in the cooker but that took a long time and I would use the microwave next time. Once melted (if using the microwave) add the the cooker. Here are my oils melting

Step Seven: Slowly pour the lye water solution into the oils. You'll start to see the oils become more opaque. This is the lye reacting with the oils. This is good. Now we get to blend!
Step Eight: I first like to stir with my blender, without it running, just to distribute everything evenly. Stir around a few times and then, with the blender completely submerged, mix with the blender on. I like to run it about 10 to 15 seconds then stir, then move to a new part, then blend again. Doing this prevents the stick blender from heating up to much and lets me see what my soap batter is doing. We're looking for the batter to achieve "trace" which is when you can see trails left on the top of the soap. Trace can be light- like a thin sauce, or it can be thick- like pudding. I blended to about a medium trace, mostly because the lighting in my kitchen is not good and I could not see a light trace.
This is about the consistency of cooked pudding before it has been cooled. See the lines left by the blender?
Once trace has been achieved, you can begin cooking! If you were doing CP soap, this is where your would scent it and the soap put into the mold. In HP, the soap is not scented until after it cooks. Cooking the soap is speeding up the saponification process for us.
Step Nine: Put the lid on the cooker and turn it to low. I use low because I didn't want my mixture to heat up too quickly. Note:There is actually not much of a temperature difference between the "low" and "high" settings on a slow cooker. The difference is how quickly the cooker reaches its maximum temperature. Low takes longer while high is faster.
Step Ten: After about 30 minutes you'll notice the soap starting to "cook", or turning translucent at the edges. This is a good sign. Sometimes there will be beaded liquid on top. This didn't happen to me but if it does, it is simply just the glycerin being produced. Put the lid back on and continue to cook.
Here is my soap psumani
You can choose to stir up your soap if you wish or let the "psunami" contine. I did not stir. Cover and let cook some more. Eventually, after another 30 to 60 minutes, the soap will look like Vaseline and be clear-ish and shiny. Mine had the consistancy of mashed potatoes. At this point, do stir the soap. If you see any light or white colored bits left, the soap is not done cooking and needs to go longer. It all depends on your cooker and recipe. Once it all looks clear, then your are good to go to the next step!
Step Eleven: It is okay to turn the cooker off at this point. Now you can add your fragrance and any colorant, if using. I used about an ounce (weight) of Sage Sweetgrass and Cedar fragrance from Sweet Cakes for my 2 pound recipe. I also added about a half cup of ground oatmeal to the whole batch then removed about 2 cups and colored it with a bit of turmeric for a yellow swirl.
Step Twelve: Once all of your additives have been stirred in, scoop your soap into your desired molds. Try to work quickly before everything cools down. Once the molds are filled, set aside and let cool and harden. I let mine rest overnight.
Soap in the molds
Step Thirteen: Once your soap has cooled, take it out of the mold and cut into your desired thickness. I didn't measure my bars so they don't look as nice as they could. Also, I had a heck of a time peeling of the Pringles can; my soap kept wanting to stick. Your mileage may vary. Once cut you can either use right away or, if you want longer lasting soap, let them dry on a rack. I have some that I am using now and the rest are drying in a cardboard box lid. When drying, be sure to turn the soap every few days.
Step Fourteen: Do all those dishes!! It actually isn't too difficult since the residue in the cooker is soap. Because of this, I have no problem with using it to cook in. Actually, I made dinner in it the next day! As long as it's washed out well, there is no problem. However, I would not use my stickblender for food. It comes in contact with raw (with the lye still active) soap and has too many small nooks on the bottom for me to feel comfortable using them for food. I also have separate dishes, bowls, and spatulas for soap making.
My recipe bubbles really well and isn't drying to the skin! I do hope you'll reasearch soap making and give it a try!


