Thursday, November 10, 2011

Fall Apple Cake

Where has fall gone? More importantly, where has time gone? The leaves have almost completely fallen off of the trees and Thanksgiving is just around the corner. Time has flown since September and summer seems like a far off notion. Lately my thoughts have been filled with apple cider, pumpkin pie, and warm cinnamon confections. Even though winter is trying to rear his head early this year (We had snow!! I almost fell down the steps...) I'm determined to make fall last.

This cake is a perfect way to savor the fruits of fall. A lightly spiced cake studded with crunchy pecans and soft baked apples, all cloaked in an amazing brown sugar glaze. (Wow that sounded poetic)
No process pictures here today, just enjoy a picture of the final product. Which, by the way, I'm devouring as I type this.

Recipe from Lick the Bowl Good

Apple Cake, slightly changed from original
  • 1 1/2 cups all purpose flour
  • 3/4 cup sugar
  • 1/2 teaspoon baking soda
  • 1/2 teaspoon salt
  • 1/2 teaspoon cinnamon
  • 2 eggs
  • 1/2 cup vegetable oil
  • 1 teaspoon vanilla
  • 1 1/2 cups chopped apples, I left mine unpeeled
  • 1/2 cup pecans, chopped
Brown Sugar Glaze:
  • 1/2 cup packed light brown sugar
  • 3 Tablespoons butter
  • 1/2 teaspoon vanilla
Preheat the oven to 350* and grease an 8 or 9 inch baking pan. Either round or square will work.
Combine the flour, sugar, baking soda, salt, and cinnamon in a medium bowl. In a large mixing bowl beat the eggs until light and foamy then beat in the oil and vanilla. Gently stir in the flour mixture until just combined. Dump in the apples and pecans and lightly stir. Scrape into the prepared pan and bake for about 40 minutes or until lightly browned. Place the pan onto a rack to cool.
Immediately after the cake comes out of the oven, make the sauce. I made mine in the microwave and it turned out fine. Combine everthing in a glass 2 cup measure and heat in the microwave for 30 seconds. Stir and then heat in 15 second increments, stirring in between, until the brown sugar dissolves. My microwave is not very powerful so check often!
Pour the glaze all over the hot cake and let it soak in. If you want to be like me, immediately cut a slice and devour. If not, let cool completely and then devour.
Enjoy!

Saturday, October 15, 2011

Picture for you.

I realised I did not share a picture of my finished and cut Crock Pot soap. Here it is. I renamed it North Woods Cedar  because cedar is what it primarily smells like. Though in a good way. Reminds me of when I went to New Hampshire all the balsam trees there.


I was testing out my new light reflectors. A bit of a challenge when the sun isn't out to provide light!

Thursday, October 13, 2011

Crock Pot Soap, part two.

Now that you've read up on soapmaking, here's how I made my soap!
I found my recipe online but checked it in a lye calulator to make sure it was accurate.
Note: do not use an online recipe without first running it through a lye calulator. Do not substitute oils in a recipe without using a lye calculator.

My preferred calculators are
Soap Calc and the one from Majestic Mountain Sage.
Once you've completed your recipe, time to get down to business! Gather up your gear.
This includes: oils and fats, lye, water (distilled is preferred), fragrance, a container to mix the lye solution, a container to weigh the lye in, a bowl to weigh the oils in, lye mixing spatula/ spoon, oil/soap spatula, accurate scale (which at least measures in ounces, I use grams) stick blender, crock pot, and molds. If you want to do a swirl you need additional containers. It sounds like a lot, but a lot of these things I found free or cheap from thrift stores and from family who were getting rid of some things.
With hot process, you can use almost anything for a mold. I used a Pringles can and an old cardboard butter box. No need to line them. (Though my soap stuck like a beast to the chip can)

I apologize in advance for the lack of prep pictures but I did not want to get too distracted while handling the lye and make a mistake.


Step One:
Prepare all of your supplies in your soaping area and don your protective gear. I wear long pants, long sleeves, and heavy gloves for washing dishes. My gloves like to slip so I put bands around them.
I think I paid a dollar for them.

I would also recomment eye protection/goggles and a face mask if you are sensitive to fumes. I like to protect my work counter with a plastic tablecloth as well, just in case the lye spills.


Step Two: Take your designated oil-weighing bowl and weigh your liquid oils. Add them to the slow cooker. Be sure to scrape out the bowl really well (I had the cooker off at this point, warm would be okay too).

Step Three: Measure or weigh out your water. I weigh since I like to use a mixture of ice cubes and regular water. Note that water is the only thing that you can use fluid measures for!
Step Four: Place your lye bowl on the scale (don't forget to zero/tare the scale!!) and measure out the lye.  Then, slowly pour the lye into the water, stirring constantly. Always pour lye into water, not the other way around or it may cause a very serious reaction. I like to think "the snow falls on the lake."

Step Five: Stir until the mixture becomes clear and all the lye has dissolved, then set aside to cool a bit.


Step Six: In your oil bowl, measure out all of your hard fats. At this point you can add them to the slow cooker to melt or melt them in the microwave. I let them melt in the cooker but that took a long time and I would use the microwave next time. Once melted (if using the microwave) add the the cooker. Here are my oils melting


Step Seven: Slowly pour the lye water solution into the oils. You'll start to see the oils become more opaque. This is the lye reacting with the oils. This is good. Now we get to blend!

Step Eight: I first like to stir with my blender, without it running, just to distribute everything evenly. Stir around a few times and then, with the blender completely submerged, mix with the blender on. I like to run it about 10 to 15 seconds then stir, then move to a new part, then blend again. Doing this prevents the stick blender from heating up to much and lets me see what my soap batter is doing. We're looking for the batter to achieve "trace" which is when you can see trails left on the top of the soap. Trace can be light- like a thin sauce, or it can be thick- like pudding. I blended to about a medium trace, mostly because the lighting in my kitchen is not good and I could not see a light trace.
This is about the consistency of cooked pudding before it has been cooled. See the lines left by the blender?


Once trace has been achieved, you can begin cooking! If you were doing CP soap, this is where your would scent it and the soap put into the mold. In HP, the soap is not scented until after it cooks. Cooking the soap is speeding up the saponification process for us.


Step Nine: Put the lid on the cooker and turn it to low. I use low because I didn't want my mixture to heat up too quickly. Note:There is actually not much of a temperature difference between the "low" and "high" settings on a slow cooker. The difference is how quickly the cooker reaches its maximum temperature. Low takes longer while high is faster.


Step Ten: After about 30 minutes you'll notice the soap starting to "cook", or turning translucent at the edges. This is a good sign. Sometimes there will be beaded liquid on top. This didn't happen to me but if it does, it is simply just the glycerin being produced. Put the lid back on and continue to cook.

Here is my soap psumani


You can choose to stir up your soap if you wish or let the "psunami" contine. I did not stir. Cover and let cook some more. Eventually, after another 30 to 60 minutes, the soap will look like Vaseline and be clear-ish and shiny. Mine had the consistancy of mashed potatoes. At this point, do stir the soap. If you see any light or white colored bits left, the soap is not done cooking and needs to go longer. It all depends on your cooker and recipe. Once it all looks clear, then your are good to go to the next step!

Step Eleven: It is okay to turn the cooker off at this point. Now you can add your fragrance and any colorant, if using. I used about an ounce (weight) of  Sage Sweetgrass and Cedar fragrance from Sweet Cakes for my 2 pound recipe. I also added about a half cup of ground oatmeal to the whole batch then removed about 2 cups and colored it with a bit of turmeric for a yellow swirl.

Step Twelve: Once all of your additives have been stirred in, scoop your soap into your desired molds. Try to work quickly before everything  cools down. Once the molds are filled, set aside and let cool and harden. I let mine rest overnight.
Soap in the molds
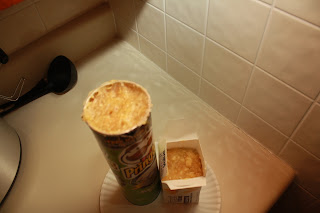


Step Thirteen: Once your soap has cooled, take it out of the mold and cut into your desired thickness. I didn't measure my bars so they don't look as nice as they could. Also, I had a heck of a time peeling of the Pringles can; my soap kept wanting to stick. Your mileage may vary. Once cut you can either use right away or, if you want longer lasting soap, let them dry on a rack. I have some that I am using now and the rest are drying in a cardboard box lid. When drying, be sure to turn the soap every few days.

Step Fourteen: Do all those dishes!! It actually isn't too difficult since the residue in the cooker is soap. Because of this, I have no problem with using it to cook in. Actually, I made dinner in it the next day! As long as it's washed out well, there is no problem. However, I would not use my stickblender for food. It comes in contact with raw (with the lye still active) soap and has too many small nooks on the bottom for me to feel comfortable using them for food. I also have separate dishes, bowls, and spatulas for soap making.

My recipe bubbles really well and isn't drying to the skin! I do hope you'll reasearch soap making and give it a try!

Tuesday, October 11, 2011

Adventures with the Crock Pot

I had originally planned on sharing an awesome chicken braise recipe today but then I decided to share something a little different.

Soap
Crock Pot Soap.
Really.

I recently started making soap after a good friend of mine agreed to teach me. She soaps with the Cold Process (CP) method and she creates amazing soaps. After some careful bribery, she showed me how and I've been hooked ever since. It's so much fun to choose what scents I want to use and the I love the satisfaction of knowing I've made something from scratch.
Soap making seems to be a lost art, I think because of they many myths that surround it
A few common misconceptions about home soap making are:
        Lye is dangerous- Yes, when handled incorrectly, lye can be very harmful to one's health. If handled correctly and if a person takes all necessary precautions, lye can be used safely.
       Lye doesn't have to be used to make soap-    No lye=no soap. If soap is made correctly then there should be no excess lye. Lye combines with fats/oils to create soap; it is a chemical reaction, like hydrogen and oxygen to make water.
        There's lard/oil/fat in your soap and I don't want to wash with fats- See above. Lye reacts with these oils to create soap and glycerin (a natural byproduct), nothing more.
       I prefer *brand name commercial soap*- I did too until I used homemade soap. It's the only soap I can wash with without breaking out in dry patches and itching. Plus, after doing some research, I found out what was in commercial soaps: detergents with synthetic chemicals to enhance lather. Not exactly what I want to be washing with. Commercial soaps are often stripped of the natual glycerin, which is then sold for profit to other companies for use in other applications.

Please note that I encourage all readers to read up on safe soap making procedures before attempting to make soap. Also, it is important to wear protective clothing when handling lye and making soap.

Also, note that there any many different website that can provide a much more in depth look at soap making than I have here.
Since soap making can be so in-depth, check back tomorrow for Part Two of Crock Pot Soap. In the meantime, I highly recommend that the beginner soapmaker check out these helpful links.
http://chickensintheroad.com/house/archives/soaps/
http://www.millersoap.com/
http://www.soap-making-essentials.com/hot-process.html  HP tutorialhttp://www.mommamuse.com/2006/02/17/instructions-for-making-crock-pot-handmade-soap/
http://www.orthogonalthought.com/blog/index.php/2008/05/homemade-natural-soap-basic-recipe/ Very in-depth and thorough explaination on how to make CP soap. There is a link at the bottom for a very excellent HP tutorial as well
http://www.soapmakingforum.com/  an excellent soap making community.

Wednesday, September 21, 2011

Sweet Treats to Share

Last week I mentioned how I have a full college schedule and often get home late. One of my classes is a Low Incidence Disability Support class on Tuesdays from 5pm to 8pm. Paying attention is often difficult because around 7 o'clock my stomach starts grumbling. I decided last week that I wanted to bring in some snacks for the rest of my table after we all discussed how we'd love to order a pizza and put it in the middle of the table. (No desks, just a few round tables) I decided chocolate chip cookies would be perfect and I even had a recipe I'd been itching to try out. The Cooks Illustrated Best Chocolate Chip Cookies are my current favorite but I've read some good things about Alton Brown's "The Chewy" and decided to give those a whirl. Unfortunately, the natural light was really bad that day, I think it was storming, so the photos are limited. I need to get a light box or something.

I didn't change the recipe at all so I won't write it all out here.


Here's the dough all mixed up. It was really soft. I think I would add more flour next time because the cookies turned out flat. (See below) Very good to eat though, I love raw cookie dough.

The cookies baked at 350 for 12 minutes though the recipe called for 15. I'm glad I checked them because they would have burned.


Surprisingly, even though they were really brown, they were still quite chewy and delicious. The flavor is not as deep and "caramelly" as the Cooks Illustrated and I'll probably stick with that recipe. Sadly, the class ended of being cancelled for the week but that meant I could eat them all myself! Oh and I gave a few to DB.

DB liked them. Mostly because...well...they're cookies and how could he turn them down? He also loves cookie dough. I let him lick the bowl.


He was giving me the evil eye because I took his picture. Yeah...we're kind of strange sometimes.

Friday, September 16, 2011

Fall Friday

Whew. What a busy month September has been so far. College classes started at the beginning of the month and I also was hired at a new part-time job! Balancing a full time class schedule with work has been a learning process and I feel bad that my blog is being neglected.
Most days of the week I do not get home until after 8pm which makes it hard to find to cook (Thank you DB for cooking and helping out with household-y things these past few weeks!!!) and on the odd day I do have time, I  forget to take a picture of whatever I made. Thankfully, I have some recipes stocked up and photographed and I just have to get them from computer to here.

I admit I made this recipe a few weeks ago but happliy enough the weather took another cool turn so I think it's fitting that I share it with you now- Homemade Beef Stew. This was a really easy recipe and totally customizable to your personal tastes. The original recipe was for a slow cooker but I used a dutch oven on the stovetop instead. Serve this with buttered biscuits.

Homemade Beef Stew
adapted from Down to Earth

2 Tbsp oil
2 pounds of stew meat cut into cubes. I used chuck
2 tsp paprika
1 large onion, chopped
3 carrots, chopped into rounds
4 medium-ish potatoes, I like a lot of potatoes
1 sweet potato, diced
2 tablespoons flour
1 cup water
bay leaf and a sprinkle of dried thyme. Rosemary would also be good.

Pat the meat dry with paper towels, season with salt and pepper. Heat the oil in a large dutch oven. Get it really smokin' hot then toss the meat in there. Let it sit a minute then stir it around. When the meat is well seared, remove it to a plate and set aside. Add a teeny bit more oil to the pot if it needs it and toss in the veggies. Get them nice and brown then add the beef back in. At this point the bottom of the pot should have a lot of brown crusty stuff of the bottom. This is your delicious-ness. Stir in the flour and cook for a minute to get rid of the raw flour taste. Next, pour in the water, be sure to scrape up all of the brown bits from the bottom. Bring this to a boil, then turn down the heat and add the bay leaf and thyme. Cover and simmer on low until the potatoes are tender. While it's cooking, get to work on the biscuits! Stew need biscuits!
Veggies all chopped up.

The finished stew. This amount of flour does not make it super thick like a canned beef stew. More like a thick sauce. I prefer it this way because I like to mush up all of the veggies with the gravy. Sounds gross but I love it.

Sunday, August 28, 2011

Quick, Easy Pork Chops

Wow. Where has time gone. It seems just yesterday that the month of August was just beginning and now it's almost at a close. Time has flown this summer. I've moved out of my parents house, had my sanity tried, learned how to grocery shop, learned that a dishwasher is a precious commodity, become an expert at making grocery lists, attempted to adjust my cooking for 2 instead of 4+ (not always successfully!) and  now it's back to school tomorrow. What?!
Instead of juggling cooking for two and various household chores, I'll be juggling books and schedules and homework papers. I'm not sure where dinner will fit in between going to class (ew, class at 5pm til 8pm!) and homework but I suppose it'll work out somehow.
I've been testing out recipes to find ones that will work with both my and DB's schedules. His schedule, unfortunately, tends to run opposite mine; he sleeps during the day and works at night, which leaves little time for an elaborate dinner.

These pork chops from Simple and Delicious fit my criteria perfectly. Easy, fast, tasty, and everything on hand. Done and done. DB pronounced them "Awesome" and I have a feeling they will be on the menu in the future.

Sadly, I only have a (very bad) picture of the finished dish, but it's so quick and simple to prepare, the pictures wouldn't show much.

4 bone-in pork loin chops (the loin chops at my grocery were way too thin so I bought boneless country style chops and pounded them to an even thickness)
1/2 teaspoon salt
1/4 teaspoon pepper
1 tablespoon Olive Oil
1/4 cup sliced onion  (I used 1/2 an onion, sliced)
2 garlic cloves, minced
1/2 cup Worcestershire sauce
3 tablespoons honey
1 tablespoon Dijon mustard

Sprinkle pork chops with salt and pepper. In a large skillet, brown chops in oil. Remove and keep warm.
In the same skillet, saute onion until tender. Add garlic; cook 1 minute longer. Add the Worcestershire sauce, honey and mustard to the skillet; stirring to loosen browned bits from pan. Bring to a boil. Return chops to the pan. Reduce heat; cover and simmer for 15-20 minutes or until tender.


Served with quick microwaved snow peas and carrots. I hope you find this dish as delicious as DB and I did.